

How To Fix Vulnerabilities Detected By Openvas
In this lab, you lot will utilize the OpenVAS and Nessus vulnerability scanners to probe the Metasploitable2 VM for potential weaknesses.
Tip 1: This lab has a good deal of "bustle up and wait", where y'all wait while the scanner is fetching the latest vulnerabilities, and wait while the scan runs. I suggest opening a 2nd tab in your panel and/or web browser so that you tin can showtime configuring the second scanner while waiting for the starting time to finish.
Tip 2: Your setup or scan piece of work will complete faster if you increment your Kali resource resource allotment across ii CPU cores and 2GB of RAM in your virtual machine monitor that it defaults to. Try for three-4 CPU cores, and 4GB of RAM, assuming your host system has those resources available.
Warning: Does your computer have less than 8GB of RAM? You should carefully consider how much RAM you can afford to give to your Kali VM without going into swap. If retentiveness is very tight, you may need to run only one scanner at a time, and ensure that the previous scanner is shut downwardly before moving onto the next.
OpenVAS is a total-featured vulnerability scanner. Its capabilities include unauthenticated testing, authenticated testing, diverse high level and low level Internet and industrial protocols, operation tuning for large-calibration scans and a powerful internal programming language to implement whatsoever type of vulnerability examination.
The scanner is accompanied past a vulnerability tests feed with a long history and daily updates. This Greenbone Community Feed includes more than 64,000 vulnerability tests.
To install OpenVAS in your Kali VM, perform the following steps:
Update Kali:
$ sudo apt update $ sudo apt -y upgrade Install and configure OpenVAS. Notation that, as of 2020, the commands are prefixed with GVM, short for Greenbone Vulnerability Direction.
$ sudo apt install openvas $ sudo apt install postgresql-14 # If needed, Leap 2022 addition... $ sudo gvm-setup The gvm-setup control will accept a long time to download all the vulnerabilty definitions. Why don't you lot open up a new last tab and skip ahead to the Nessus setup while this runs in the groundwork?
Update the signatures used in OpenVAS scanning:
$ sudo gvm-feed-update # Should run into a long listing scroll past your screen! $ sudo gvmd --rebuild # Required, otherwise you'll just see vulnerability IDs # and not names in the GUI #SadOutput The gvmd --rebuild control volition take a long time to build all the vulnerability definitions. The control will return immediately, but run in the background. You lot tin can continue and launch OpenVAS.
First OpenVAS:
$ sudo gvm-commencement # Starting time openvas # At this point, the following services should be running: # greenbone-security-assistant # opsd-openvas # gvmd The user "admin" was created with a random password at the cease of the gvm-setup procedure. You lot tin save that login if you prefer, or create a new login account with a new more memorable countersign past the CLI:
$ sudo runuser -u _gvm -- gvmd --create-user=admin $ sudo runuser -u _gvm -- gvmd --user=admin --new-countersign="XXXXXXXXX" Open your web browser and go to https://127.0.0.1:9392 (or it will be car-opened for you). Have the self-signed certificate and login with the user and the countersign you just created.
Do not configure or initiate a browse until y'all see CVEs and NVTs in the scanning tool dashboard. OpenVAS is processing the newly-downloaded signatures in the background, and the scanner will not be bachelor until that piece of work is finished.
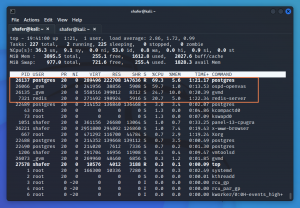
If you want to monitor the system condition, run the height programme at the command line. While the signatures are beingness processed, you should come across several OpenVAS related programs (ospd-openvas and gvmd) and several databases (postgres and redis-server) all actively consuming CPU resources.
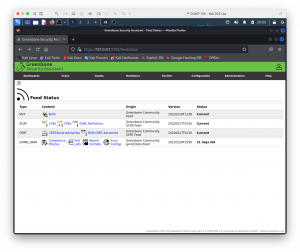
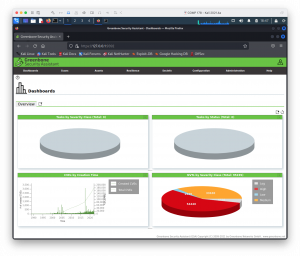
When the signatures are fully processed, the Administration->Feed Status folio should evidence your feeds as "Electric current", and the master Dashboard should show graphs of CVEs and NVTs.
Now that the scanner is gear up, it'due south time to configure a browse! Go to Scans ->Tasks, click on the "magic wand" icon, and cull job wizard. Enter the IP of the Metasploitable2 VM and choose "Start Scan". The tasks page will refresh every thirty seconds with the results of the scan.
The detailed scan will take a while to finish....
You lot tin can scan, just wait for the scan to fully complete to 100% before answering the questions...
At the carte du jour, go to Scans->Reports and view the results for the task you just completed. Ensure its status is reported every bit Washed, and non ERROR. If barely any results are reported, consider that scan a failure and re-run information technology. Once the browse has finished, answer the Deliverables questions.
When you're finished with the OpenVAS section of the lab, you can close the program downward.
$ sudo gvm-stop Deliverables:
- How many high, medium, and depression severity items were establish?
- In OpenVAS, get to Scans -> Results. On the "Results by Severity Class" pie chart, restrict the list to vulnerabilities scoring as "Loftier. Find the one labeled "TWiki XSS and Control Execution Vulnerabilities". Answer the post-obit questions but for this specific vulnerability.
- What installed version of TWiki is Metasploitable2 using? (Note that this version string won't necessarily be valid, indicating the limitations of version detection)
- What is the oldest version of TWiki that contains a fix to this arbitrary code execution vulnerability?
- What are the two CVE (Common Vulnerabilities and Exposures) numbers for these related TWiki vulnerabilities?
- Submit the Written report from OpenVAS for this scan in PDF format (Become to Scans->Reports, click on the date of the scan desired, and in the toolbar choose the "Download Filtered Report" button. Change the Report Format to PDF)
Deliverable (Essay):
Selection ane of the vulnerabilities scoring equally MEDIUM or HIGH on the rating scale, but avoid the "End of Life Detection" reports, as those are boring. Also avert the TWiki vulnerability we only examined. Provide the title OpenVAS gives and and then explain the vulnerability in your own words, as if you were explaining to another student. Copying and pasting text from the OpenVAS report is NOT a sufficient caption here. Y'all may need to follow the links OpenVAS provides and/or search for additional data on your own.
In your answer, explain:
- What is the vulnerability?
- How could information technology be exploited?
- How could information technology be fixed?
A 2 paragraph answer is a sufficient level of detail.
OpenVAS (GVM) Troubleshooting
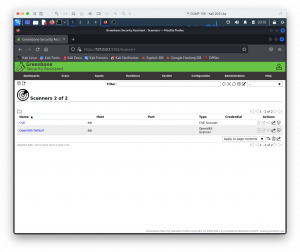
To practise a successful scan, the GVM dashboard must bear witness CVEs and NVTs, the Configuration->Scanners folio should show two scanners (CVE and OpenVAS Default), and the Administration->Feed Condition page should testify all feeds either "Electric current" or updated inside the concluding month. They should not say "Rebuilding".
To verify the installation and configuration of OpenVAS:
# How much RAM does Kali have allocated to information technology? 4GB is a reasonable amount. $ free -m # Look at the MEM row, under the TOTAL column # total used costless shared vitrify/cache available # Mem: 3909 1224 407 threescore 2278 2342 # Bandy: 975 52 923 # Is there space left on deejay? (vuln definitions are large, cumulatively) $ df -h / # Filesystem Size Used Avail Utilize% Mounted on # /dev/sda2 28G 22G 5.3G 81% / $ sudo apt autoremove # Might free up some disk infinite - removes old updates # Is your feed up to date? $ sudo gvm-feed-update # Have you rebuilt the db after updating your feed? $ sudo gvmd --rebuild # Is GVM running? $ sudo gvm-beginning # Should load greenboard-sercurity-assistant.service # Should load gvmd.service # Should load ospd-openvas.service # Are at that place scanners configured and active? $ sudo runuser -u _gvm -- gvmd --become-scanners # 08b69003-5fc2-4037-a479-93b440211c73 OpenVAS /var/run/ospd/ospd.sock 0 OpenVAS Default # 6acd0832-df90-11e4-b9d5-28d24461215b CVE 0 CVE # Do you have a user account to log into the web console with? $ sudo runuser -u _gvm -- gvmd --get-users --verbose # admin 69431492-e29e-486d-8646-20aa0b939aef # shafer 010eb26d-49e1-4ba3-bd17-04ead05ad161 # Does the self-checkup discover anything amiss? $ sudo gvm-bank check-setup # (Lots of output...) # (Lots of output...) # (Lots of output...) # It seems like your GVM-21.iv.three installation is OK. Nessus is a commercial vulnerability cess scanner. OpenVAS is based on the original open source version of Nessus dorsum in ~2005, simply they have diverged significantly since then.
First, annals for a personal activation code at https://www.tenable.com/tenable-for-pedagogy
Second, download a re-create of Nessus from https://world wide web.tenable.com/downloads/nessus. The current version of Nessus as-of Feb 2022 is 10.one.1 and since you are installing it into Kali (which is Debian-based), you desire to look for the file Nessus-10.i.i-debian6_amd64.deb. Have the license agreement, and the download will begin.
To install Nessus:
# First change directory ('cd') to wherever the # .deb installer is. Then: $ sudo apt install ./Nessus-10.1.1-debian6_amd64.deb Annals Nessus:
Register the program with the "Nessus Essentials" activation lawmaking that was emailed to you. After activation (and only afterwards!) will Nessus download the current set of vulnerability plugins to scan for.
$ sudo /opt/nessus/sbin/nessuscli fetch --annals thirty-thirty-xxxx Add Nessus User:
$ sudo /opt/nessus/sbin/nessuscli adduser # Pick your username # Pick your password # Aye nosotros want this user to exist 'system administrator' # Blank rule gear up # YES to confirm First Nessus:
$ sudo systemctl start nessusd $ sudo systemctl status nessusd # Verify it'southward running Access the Nessus web GUI at https://localhost:8834
- Accept the self-signed certificate.
- Wait (and wait, and wait) while Nessus compiles all the plugins.
- Login with the user account you previously created
Nessus External Scan: Tell Nessus to practise an "Advanced Browse" of your Metasploitable2 VM:
- Go to Scans -> New Browse
- On the Scan Templates page under Vulnerabilities, choose the "Advanced Scan" type
- Provide a name for your scan configuration (e.g. "External Scan")
- Provide the target IP address (in this instance, the IP address of the Metasploitable2 VM)
- Save the scan template
- Press the "Play" push button on the My Scans page to launch the scan you only created
Once the scan has finished, answer the Deliverables questions.
Deliverables (External Scan):
- How many vulnerabilities scored as critical, high, and medium did Nessus discover?
- Submit the Written report from Nessus for this scan (PDF format, Report->Consummate Listing of Vulnerabilities past Host)
Nessus Internal Scan: Tell Nessus to do an "Avant-garde Scan" of your Metasploitable2 VM. But this time, we will too give Nessus a login (credential, in their terminology) to the target organisation, allowing it to perform a greater number of tests. Nessus accepts a diversity of credentials, not just to the operating system (i.eastward. SSH or Windows login), but also to application servers like databases, virtual machine managers, etc.
- Go to Scans -> New Scan
- On the Scan Templates page under Vulnerabilities, cull the "Advanced Scan" type
- Provide a proper name for your scan (e.m. "Internal Scan")
- Provide the target IP address (in this instance, the IP address of the Metasploitable2 VM)
- Under Credentials -> SSH, change the hallmark method to countersign and enter the VMs login (msfadmin / msfadmin). This volition permit Nessus to Likewise do a scan from within the arrangement (in improver to the default external scan)
- Save the browse template
- Press the "Play" button on the My Scans page to launch the scan y'all just created
Once the scan has finished, answer the Deliverables questions.
When you're finished with the Nessus section of the lab, you tin shut the program downwardly.
$ sudo systemctl cease nessusd Deliverables (Internal Scan):
- How many vulnerabilities scored as critical, high, and medium did Nessus discover?
- Submit the Report from Nessus for this scan (PDF format, Report->Detailed Vulnerabilities by Host).
Observe that there might be a slight difference in the length of the report, compared to the earlier report type.
Deliverable (Essay):
Choice one of the vulnerabilities scoring as "Disquisitional" by Nessus. Provide the championship Nessus gives and and then explain the vulnerability in your own words, equally if you were explaining to another pupil. Copying and pasting text from the Nessus report is Non a sufficient caption here. You may need to follow the links Nessus provides and/or search for additional information on your own.
In your reply, explicate:
- What is the vulnerability?
- How could it be exploited?
- How could information technology be fixed?
A two paragraph respond is a sufficient level of detail.

How To Fix Vulnerabilities Detected By Openvas,
Source: https://cyberlab.pacific.edu/courses/comp178/labs/lab-4-vulnerability-scanning
Posted by: tamplinconelays.blogspot.com
0 Response to "How To Fix Vulnerabilities Detected By Openvas"
Post a Comment